 |
| My friends and I wish you a wonderful and happy new year! |
Saturday, December 31, 2011
Monday, December 19, 2011
Honey Rosemary Cherries and Blue Cheese Crostini
 |
| This wonderful appetizer takes about 20 minutes to prepare. |
 |
| You can also make up single-servings and present this as a first course. |
 |
| This appetizer is a great start to a celebratory meal~it is a really beautiful pairing of ingredients. Recipe~adapted from Southern Living Magazine 1 thin slice of garlic and 1 shallot, sliced very thin. 2 Tbsp. of olive oil 1 12 oz. package of frozen(thawed) or a large can of sweet, dark pitted cherries. I used cherries from Oregon Fruit Products,15 ounce can. 2Tbsp. of balsamic vinegar 2Tbsp. of honey 1/4 tsp. of chopped fresh rosemary 2 cups of loosely packed arugula 1/8 tsp. of pepper 1/8 tsp. of salt 1 loaf of ciabatta bread, cut into 1/4 inch toasted slices 8 ounces of blue cheese, room temperature Saute the garlic and shallot in the olive oil for 2 to 3 minutes. Add cherries,vinegar, honey, rosemary, salt and pepper. I also added three tablespoons of the cherry juice I reserved from the can. Cook, stirring occasionally for 8 to 10 minutes. Let this mixture stand for 10 minutes. Place the arugula on the toasted bread slices. Top each with the cherry mixture and 1 slice of blue cheese. |
Wednesday, December 14, 2011
Icicle Ornaments Cookies from Savoring Time in the Kitchen
 |
| I have been procrastinating for a few days trying to come up with some clever ideas for cookies and up pops "Savoring Times" recipe just in time! I loved the idea of having a cookie you could eat and also hang on a tree! I have been hanging these cookies all over the house just for fun..... |
 |
| Savoring Times blog suggests these are great to go with coffee, especially with the hole at the top to use for dunking the cookie into your coffee! |
 |
| Icicle Ornament Cookies ready for my guests tonight! |
 |
| These cookies were positioned around my Magnolia wreath. |
Saturday, November 12, 2011
Grains de Verre on gourds
 |
| Tonight I needed to place a little something extra on the table for my guests. I made these last year and thought I would just make a few again this season to decorate the table with. This picture does not have as many beads glued on~I liked the way it turned out. I let my guests take these home with them as a small gift of friendship! |
 |
| Here it is again, but with different lighting. You can add so many designs! |
 |
| This photo, I went heavier with the beads. |
 |
| Here are my supplies~not much required. I used the brush that comes in the glue container and gently covered the area where I wanted the beads to remain. It takes a few hours to dry, so allow plenty of time. Best to do the day before. The materials were purchased from JoAnne's Fabric Stores. |
Wednesday, November 09, 2011
A few shots from my last tour with the ladies in Tuscany.


 |
| My tours are for women only. I certainly have nothing against the guys! It's just that the gals have a special way of having fun and relaxing! We stay at four star hotels,with each person having their own room. This is how we differ from other tour groups. We stay off the beaten path and spend most of the time in the hill top villages all over Tuscany. Of course, we shop, do food and wine tastings, cooking class, visit markets and have lots of photo opportunities. We also spend time with my local Italian friends learning as much as we can about their way of life and how they get the food from the ground to the table. Our group size is between four and six ladies. Let me know if you are interested in a trip with your friends for next season~it is an incredible experience to share with your friends! It would be my pleasure to introduce you to Tuscany my way. |

Friday, November 04, 2011
Soppressata~the spicy salami
 |
| There are two stops I make when I visit Florence: the first, my favorite coffee bar, to get my jolt for the rest of the day and then, The Mercato Centrale. As soon as I step through the sliding doors, I am in my element. The hair stands up on my arms, I get so excited! If I am hungry, all I need to do is walk up to a counter and order. Should I need more coffee, I go to another favorite spot, right there in the market. I have just returned from taking my touring group for a ten day adventure. We visited the market twice.We had to do a special stop for cheese. I did one previous tour with some folks from New Zealand and had to do the same. Honestly, I could spend all day here! One of my favorite stops is the Perini section, who consistently set up an incredible display of meats and foods for display. At times, you can grab a taste or two. The first three photos were taken from their area in the market. They are located all the way towards the back, in case you go looking for them. There are plenty of signs warning you what "not" to touch or taste.... |
 |
| Then we come across the famous pig head, all skinned and no way in the world, able to grunt! |
Anyway, the Tuscan version of this sausage is indeed a head cheese: a sausage made from the pigs head and variously seasoned with spices such as pistachios, pepper and some lemon peel. This, by far, is my most favorite sausage from Tuscany.
Head cheese is not exactly a delicacy for many of us, but the Tuscans love it....and as you can see, the proud butcher displays the pigs head indicating that Soppressata is for sale at this spot, right now! Soppressata is served by itself or with other cured meats as an antipasto. It is also necessary to note that Soppressata varies in tastes from region to region in Italy.
 |
| One more fabulous display by Perini |
 |
| And, one more. Enough to make you a cheese addict! |
 |
| Not Perini, but right across the aisle. |
Sunday, October 30, 2011

Saturday, October 29, 2011
Pasta Made Easy
 |
| Not the best picture, but here comes the pasta. I did it! My very first attempt on my own! I have made pasta before in classes, but never without supervision! I loved making this! And, no written recipe ~ |
 |
| I just tossed in a few teaspoons of premium pesto and a tad of grated cheese.The pasta was cooked for two minutes or until al dente. I added a tad of salt to the boiling water before adding the pasta. Drain, then toss though with sauce. |
 |
| The ingredients to the pasta; 3/4 cup of flour and one egg. That was it. I did not add any salt or water. Make a well, add the egg. Mix the egg with fingers until all the flour is combined with the egg. You will need to knead the dough for a short time until it appears elastic~just until you get a little" bounce back with touch" in the dough. Place the kneaded dough through your pasta machine. Follow the directions for your machine to get the thickness and consistency you need before the last pass to get your long pasta. Dry for several hours on tray and sprinkle with flour to keep pasta from sticking. Enough for one serving or two small ones! |
Saturday, September 10, 2011
Parsnips instead of potatoes
  |
| Fresh parsnips located near the carrots in grocery |
 |
| Parsnips cut into small pieces for easy cooking |
 |
| Milk and cream are added during cooking |
1 pound of fresh parsnips
4 garlic cloves, smashed or chopped very finely
1 Thyme sprig, leaves chopped finely
1 cup of whole milk
1 cup of whipping cream
1 stick of unsalted butter
salt to taste
Peel parsnips just like you would carrots. Remove tough ends. Add to medium pan the chopped parsnips, thyme, salt and garlic. Add milk and cream and cook over medium heat until parsnips are tender. This will take at least 20 minutes or more. Drain and save liquid, if there is any left after cooking. Cool parsnips and place in blender or food processor. With processor on low speed, add the butter, blend until smooth. This is when you may need to add some of the reserved liquid to get it to a light and fluffy consistency. I have added heated milk a few times to get it to the consistency I like. It just depends on how creamy you want it to be!
My daughter had us over for dinner not too long ago and this was a side she served with a beef brisket she had prepared. I was delighted to see her take the leap from potatoes to parsnips! The choice was well suited and certainly complimented the brisket. The very first time I tasted parsnips was on one of my trips to New Zealand. I had this veggie as a side with a lamb shank. I had no idea what the vegetable was that I was eating. I knew it wasn't a potato and it was prepared with the same consistency of mashed potatoes.....however, I was stumped! Today I normally serve parsnips along side of lamb shanks or a roasted leg of lamb. It is the perfect combination.... the parsnip matches so well with either beef or lamb.
Thursday, September 08, 2011
Williams-Sonoma Easy Roman Pasta
 |
| Quick and easy Roman pasta |
The ingredients:
1/2 lb. spaghetti
1/4 cup of olive oil
4 large garlic gloves,thinly sliced
1 jar of Antica Enotria organic cherry tomatoes, drained*from Williams-Sonoma
4 large fresh basil leaves, thinly sliced
Kosher salt, to taste
Fennel salt, to taste
Fresh grated Pecorino cheese for serving
Bring a large pot of salted water to a boil. Add the pasta and cook until al dente, according to the package instructions. Drain, reserving 1/2 cup of the cooking water. Set aside.
In a large saute pan over medium heat,warm the olive oil. Add the garlic and cook, stirring until fragrant, about one minute. Add the cherry tomatoes and cook for about five minutes, stirring occasionally and gently smashing about half of the tomatoes. Add 1/4 cup of the reserved water and bring to a simmer.
Add the pasta and toss together until well combined and warmed through, about two minutes, adding more cooking water as needed to create a light sauce. Sprinkle with fresh basil and fennel salt. Serve immediately. Serves four. I did substitute the cheese since i had it on hand.
This dish took no time at all to prepare!
 |
| I used whole wheat pasta |
 |
| Shavings of fresh Parmesan cheese were tossed on top for a finishing touch. |
Saturday, August 27, 2011
Peach Jam Tart
 |
| I used this meal from Trader Joe's |
 |
| Baked until crust turned golden brown |
 |
| Peach Jam Tart |
 |
| I used a good quality peach jam |
1 large egg, plus one extra egg yolk for brushing on lattice top
1 teaspoon of vanilla
1 teaspoon of almond extract
2 cups of flour, plus a little extra for rolling out dough
1 cup of almond meal (flour) sweet and nutty in taste
1/2 teaspoon of cinnamon
1 stick of room temperature butter
2/3 cup of sugar
Heat oven to 375 degrees.
Grease a 10 inch tart pan. Cream the butter and sugar until light and fluffy. Add the egg, vanilla and almond extract. Mix the flours together along with the spice in a separate bowl. With mixer running, gradually add the flour ingredients into the butter mixture. Mix on low speed until dough is formed and clumps together. Take the dough and divide 2/3 of the dough to form a ball and shape the remaining 1/3 dough into a ball. Wrap the two forms of dough in plastic and chill for forty five minutes. I found I had to put the dough back in the refrigerator for another ten minutes for the lattice topping. The stiffer it was, the easier it was to lift and place on top of fruit mixture.
Roll out chilled dough on parchment paper. I did use around 3 extra tablespoons of flour while rolling out the dough to create better consistency. Place into the tart pan and spread the peach jam evenly on the dough. Roll out the remaining dough to place on top of jam. Cut the dough into strips and place in lattice pattern on top. Brush with yolk of egg and 1 tablespoon of water. Bake for 30 minutes or until crust is golden brown.
Let cool before cutting. Serves eight. Serve with whipping cream or French Vanilla ice cream.
Friday, August 26, 2011
Fresh tomatoes with Asiago and fresh herbs
 |
| Fresh beefsteak tomatoes ready for broiler |
 |
| Tomatoes just out from under the broiler |
 |
| Serve with grilled or broiled steak or chicken A wonderful way to use those fresh tomatoes from your garden! Position the oven rack at least 6 inches from the broiler. Slice four tomatoes, thick slices, and place in a safe baking dish. Sprinkle with 1/4 teaspoon of salt. Mix 1/4 cup of coarse breadcrumbs with 1/4 cup of finely grated Asiago cheese. Chop 1 tablespoon of parsley and 1 tablespoon of fresh thyme. Sprinkle mixture evenly over tomatoes and gently pour 2 tablespoons of olive oil directly over tomatoes. Broil until the breadcrumbs begin to turn brown. You will need to stay close by and watch! Drizzle with more oil before serving. |
Friday, August 19, 2011
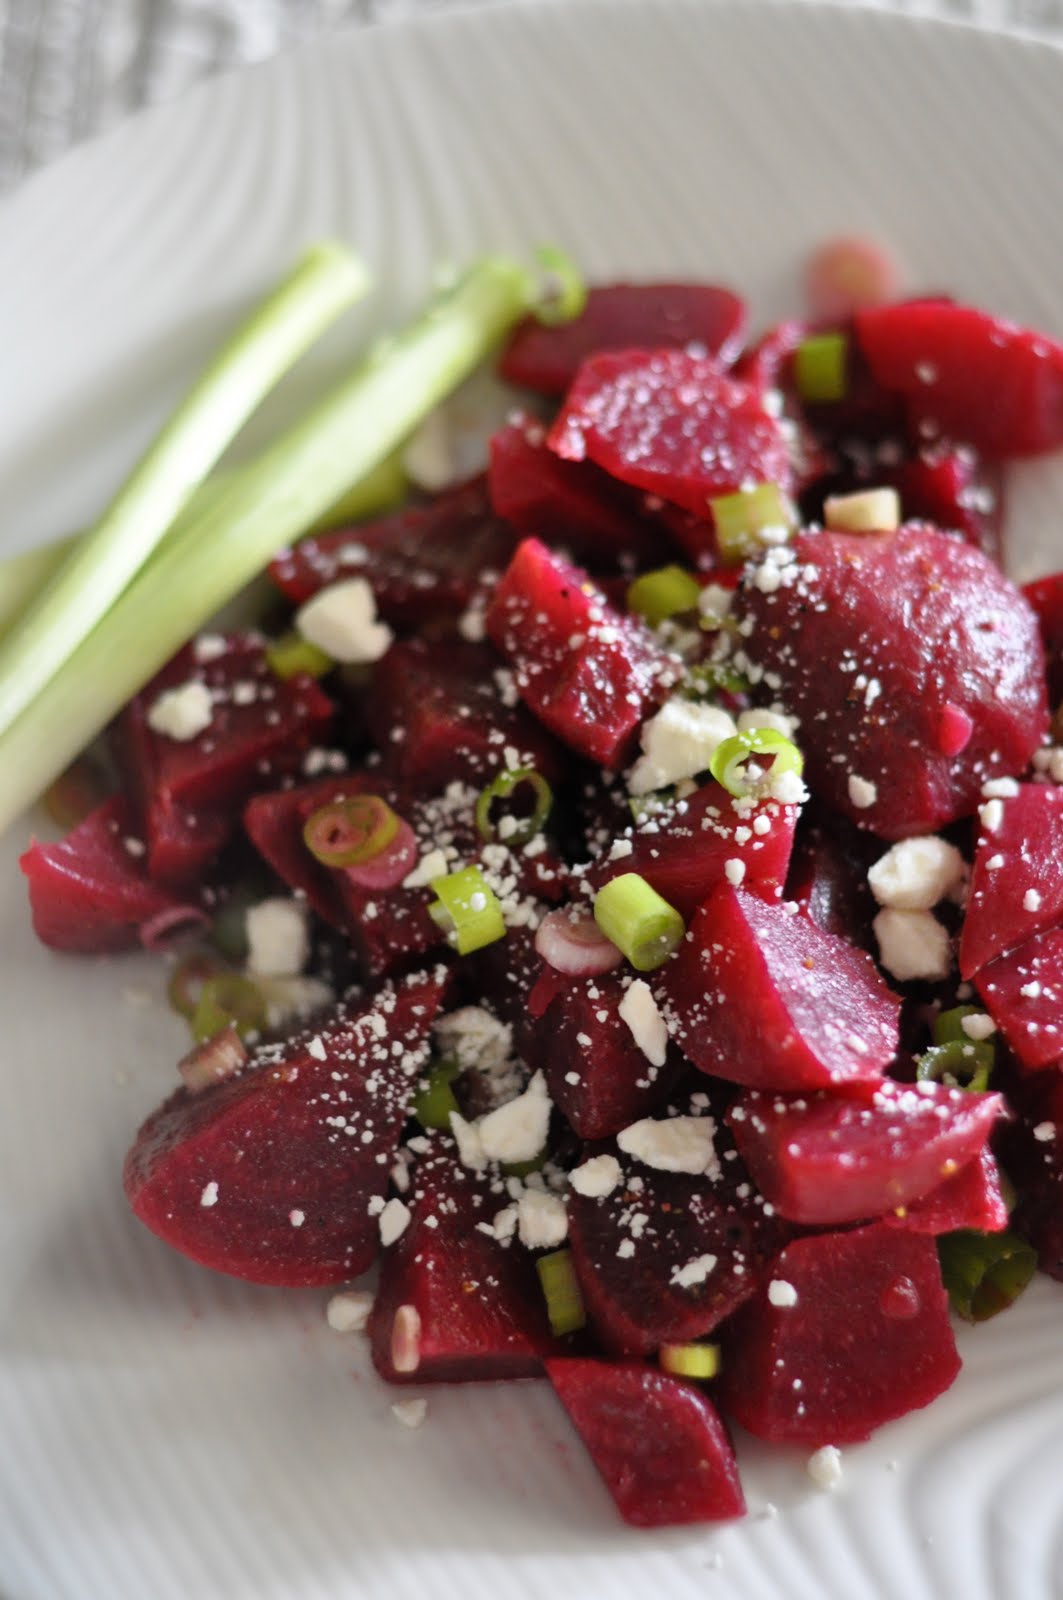
For Julie~Roasted Beets with Feta
 |
| This is what you can do with the beets from your garden like my friend, Julie! |
 |
| And, most likely, you will be growing green onions! |
 |
| If you are not growing beets, I think canned beets will do as well in this recipe. |
 |
| A wonderful and delicious summer treat! |
I was invited to several showers and weddings(outside celebrations) during past two months. No one really was good at predicting how the weather would shake out especially with the cooler temperatures that Seattle has been experiencing all summer. Many friends were so disappointed about the condition of their flower and vegetable gardens~veggies were so stunted! Flowers were not blooming! How can there be weddings outside in this freezing weather?(well not really freezing, but you get the point)Weddings went off without a hitch! Flowers and veggies, not so good! Things are finally warming, growing and shaping up.
One particular friend has a gorgeous garden this summer, but everything is "so not growing."It has just been too cold at nights and really not much above 70 degrees during the daylight. Last Sunday, Julie and I picked beets, little beets, from her garden. We managed to find four and threw them in the gathering basket. Julie wrapped them in foil, baked them to perfection and the rest is history!
There is nothing more pleasing than to have grown your own vegetables and then serve to your family. I can't tell you when I have had a better tasting beet!
Julie, when the other beets are ready, here is a quick recipe for you!
ROASTED BEETS WITH FETA
Peel 4 medium beets and cut into 1/2 inch pieces.
Toss with 1 tablespoon of olive oil.
Add one teaspoon of salt. Pepper to your liking.
Spread the beets on a baking sheet and roast until tender at 450 degrees, about 35 minutes.
Transfer to a bowl and toss in 4 chopped scallions.
Add 2 teaspoons of lemon juice, fresh if you have it.
Top with crumbled feta cheese. Serve chilled.
Another way to cook the beets is to bake then in foil, remove the skin, slice and just toss (roast) in the oven for ten minutes more with the oil, salt and pepper. Cool and add onions.
Serves 4
Thursday, August 18, 2011
Bourbon Infused Peaches
 |
| Boozy Peaches from Food Network |
 |
| Toasted pecans add that extra crunch! |


For a quick seasonal dessert~
Slice 3 or 4 peaches, depending on size, with 1 tablespoon of brown sugar
Add 1/2 teaspoon of vanilla extract
Set aside and keep cool for 30 minutes or more
Whisk 1 cup of heavy whipping cream until it just starts to thicken. Beat in 4 teaspoons of brown sugar.
Add 4 teaspoons of bourbon and beat the whipping cream until soft peaks have formed.
Layer the peaches and cream in dessert glasses.
Top with toasted pecans.
Serves 4 ~so easy and beautiful to serve!
Subscribe to:
Posts (Atom)